轮播图是在大家学习 JavaScript 时常写的小项目,网络上相关的资源也很多。我在学习的过程中,将写轮播图的经历做一些简单的总结,希望大家在看后能有所收获,如果有不对的地方,请大家在留言区指出。
前言 轮播图是什么 Q:轮播图是什么? A:简单解释:所谓的轮播图,就是几张图片轮流显示。
我们先随便找个网站访问一下,例如 淘宝网
中间的滚动区域就是轮播图。
哪些知识点 通过轮播图,我们可以巩固(学到)什么知识点呢?
DOM 操作 HTML 事件运用 定时器 无限滚动技巧 JavaScript 动画 函数递归 注意 个人建议:作为新手的我们,不管要做多么高大上的特效,都先完成静态页面,再去添加动态的处理!!!切记切记!
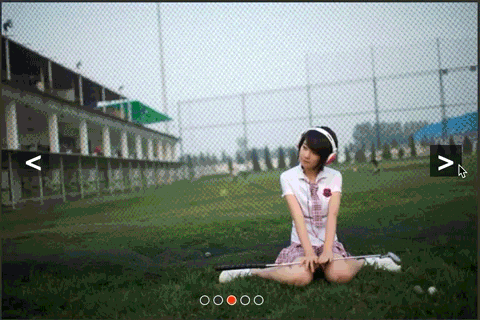
原理 实现效果 轮播图的实现效果:即在一个窗口,鼠标移入后左右箭头会出现,可以点击动画切换图片,同时下面的小圆点会跟随切换(点击小圆点可以实现同样的功能),可以在此基础上循环播放。
总结:轮播图片具备以下特点:
点击左右两边的箭头切换图片 当鼠标移出图片范围,自动间隔时间切换;当鼠标移入图片范围,停止自动切换 切换到某一张图片时,底部的圆点样式也跟着改变 点击底部圆点也会切换到相应位置的图片 基本布局 我们首先要明白轮播图的实现原理和基本布局:
将一系列大小相等的图片平铺,利用 CSS 布局只显示一张图片,其余隐藏。通过 JS 代码修改图片的偏移量实现切换,按钮绑定切换事件,或者定时器实现自动播放。
初始基本结构如下:
最外层需要有一个容器包裹着(通常是 div,类型定义为 container) 容器设置宽高,以及 overflow 为 hidden,超出宽高部分隐藏, 容器里面包含着两个容器:imgList 和 btnList 以及两个 a 标签(左右按钮) imgList 中包裹着所有的图片,宽为所有图片的总宽度,position 为 absolute(通过改变 left 来实现图片轮播的效果) btnList 中包裹着轮播图下部的指示圆点,position 也为 absolute 样式可以自己按照自己想要的修改,在此我们主要将关键部分。并且完成代码。
为节省页面空间,之后代码均不格式化,请大家自行修改。
html 结构 html 代码按照我们讲的基本布局完成,代码如下:
1 2 3 4 5 6 7 8 9 10 11 12 13 14 15 16 17 18 19 20 21 22 23 24 25 26 <body > <div id ="container" > <div id ="imgList" style ="left: -600px" > <img src ="img/5.jpg" alt ="1" /> <img src ="img/1.jpg" alt ="1" /> <img src ="img/2.jpg" alt ="2" /> <img src ="img/3.jpg" alt ="3" /> <img src ="img/4.jpg" alt ="4" /> <img src ="img/5.jpg" alt ="5" /> <img src ="img/1.jpg" alt ="5" /> </div > <div id ="btnList" > <span index ="1" class ="on" > </span > <span index ="2" > </span > <span index ="3" > </span > <span index ="4" > </span > <span index ="5" > </span > </div > <a href ="#" id ="prev" class ="arrow" > < </a > <a href ="#" id ="next" class ="arrow" > > </a > </div > </body >
代码说明:btnList 中的每一个 span 标签我们添加了自定义属性 index,是为了在 JS 处理时更方便;imgList 定义了内联属性,是为了初始显示第一张图片。
CSS 样式 代码的 CSS 样式由我们各自喜好定制即可,代码如下:
1
2
3
4
5
6
7
8
9
10
11
12
13
* { margin : 0 ; padding : 0 ; text-decoration : none; } body { padding : 20px ; }#container { width : 600px ; height : 400px ; border : 3px solid #333 ; overflow : hidden; position : relative; }#imgList { width : 4200px ; height : 400px ; position : absolute; z-index : 1 ; }#imgList img { float : left; }#btnList { position : absolute; height : 10px ; width : 100px ; z-index : 2 ; bottom : 20px ; left : 250px ;}#btnList span { cursor : pointer; float : left; border : 1px solid #fff ; width : 10px ; height : 10px ; border-radius : 50% ; background : #333 ; margin-right : 5px ; }#btnList .on { background : orangered; }.arrow { cursor : pointer; display : none; line-height : 39px ; text-align : center; font-size : 36px ; font-weight : bold; width : 40px ; height : 40px ; position : absolute; z-index : 2 ; top : 180px ; background-color : RGBA (0 , 0 , 0 , 0.3 ); color : #fff ; }.arrow :hover { background-color : RGBA (0 , 0 , 0 , 0.7 ); }#container :hover .arrow { display : block; }#prev { left : 20px ; }#next { right : 20px ; }
JS 代码书写 接下来让我们一步一步完成。
获取页面的 DOM 元素,如下: 1 2 3 4 5 let oDiv = document .getElementById('container' )let oImgList = document .getElementById('imgList' )let oButtons = document .getElementById('btnList' ).getElementsByTagName('span' )let oPrev = document .getElementById('prev' )let oNext = document .getElementById('next' )
给两个按钮绑定点击事件,来移动 imgList: 1 2 3 4 5 6 oPrev.onclick = function ( oImgList.style.left = parseInt (oImgList.style.left) + 600 + 'px' } oNext.onclick = function ( oImgList.style.left = parseInt (oImgList.style.left) - 600 + 'px' }
抽象出 animate 两个点击事件中移动 imgList 的代码我们可以抽象出来,改为如下:
1 2 3 4 5 6 7 8 9 function animate (offsetLeft ) oImgList.style.left = parseInt (oImgList.style.left) + offsetLeft + 'px' } oPrev.onclick = function ( animate(600 ) } oNext.onclick = function ( animate(-600 ) }
此时按下 next 按钮和 prev 按钮可以实现翻页,但是没有边界判断,会翻出空白来,所以我们添加边界条件。
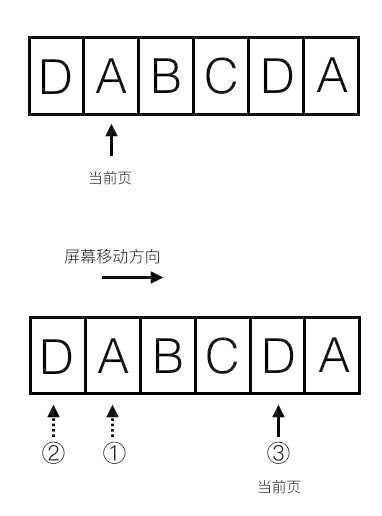
当我们翻页到第一张 时,再翻上一页,会翻到第 5 张图,所以我们在第一张前面添加了一个第五张图片的缓冲图 ;同理 当你翻页到第五张 之后,再翻下一页,会到第一张的缓冲图 。
此处我多做一些说明:
假设我们有 N 张照片,把容器宽度设置为N+2 个图片的宽度,示例如下图,两端填充如图,当处于一端时,且即将进入循环状态的时候,如第二张图,从状态 1 滑动到状态 2,在滑动结束的时候,将当前的位置直接转到状态 3,直接修改容器偏移,在视觉上是循环的。
添加边界条件 将 animate 改为如下代码:
1 2 3 4 5 6 7 8 9 function animate (offsetLeft ) oImgList.style.left = parseInt (oImgList.style.left) + offsetLeft + 'px' if (parseInt (oImgList.style.left) > -600 ) { oImgList.style.left = -3000 + 'px' } if (parseInt (oImgList.style.left) < -3000 ) { oImgList.style.left = -600 + 'px' } }
将代码中的冗余变量做提取:
1 2 3 4 5 6 7 8 9 10 function animate (offsetLeft ) let newLeft = parseInt (oImgList.style.left) + offsetLeft oImgList.style.left = newLeft + 'px' if (newLeft > -600 ) { oImgList.style.left = -3000 + 'px' } if (newLeft < -3000 ) { oImgList.style.left = -600 + 'px' } }
绑定圆点跟随效果 我们在按钮按下轮播图轮播的时候,需要底部圆点也跟随移动用作指示效果:
首先我们定义一个变量 index 方便操作,我们要在每次点击时显示圆点变化,代码如下:
1 2 3 4 5 6 7 8 9 10 11 oPrev.onclick = function ( index -= 1 showButton() animate(600 ) } oNext.onclick = function ( index += 1 showButton() animate(-600 ) }
那么显示部分的代码如何编写呢?
1 2 3 4 5 6 7 8 9 function showButton ( for (let i = 0 ; i < oButtons.length; i++) { if (oButtons[i].className === 'on' ) { oButtons[i].className = '' break } } oButtons[index - 1 ].className = 'on' }
此时尝试,会发现,圆点跟着变化了,但是圆点并没有设置边界条件,接下来给圆点设置边界:
1 2 3 4 5 6 7 8 9 10 11 12 13 14 15 16 17 18 19 oPrev.onclick = function ( if (index === 1 ) { index = 5 } else { index -= 1 } showButton() animate(600 ) } oNext.onclick = function ( if (index === 5 ) { index = 1 } else { index += 1 } showButton() animate(-600 ) }
绑定圆点点击事件 我们想要实现在点击圆点的时候,图片也会进行切换,思考一下和点击翻页有什么不同??
翻页时:每次只会左移和右移固定的宽度,但是点击圆点时,左移和右移的宽度需要我们计算得出,比如从 1 到 3 那就需要移动 1200px。
1 2 3 4 5 6 7 8 9 for (let i = 0 ; i < oButtons.length; i++) { oButtons[i].onclick = function ( let myIndex = parseInt (this .getAttribute('index' )) let offsetLeft = -600 * (myIndex - index) animate(offsetLeft) index = myIndex showButton() } }
优化 如果当前页面在第一张图片,再次点击第一张图片,不应该进行切换,所以我们应该给是否点击当前页面做判断。
1 2 3 4 5 6 7 8 9 for (let i = 0 ; i < oButtons.length; i++) { oButtons[i].onclick = function ( if (this .className === 'on' ) { return } ... ... } }
至此,我们的基本页面已经完成了,接下来完成动画效果部分。
动画效果 动画效果我们不采用 CSS3 实现,全部采用 JS 实现,利用 JS 的递归,在一定时间之内,对 left 的偏移量进行细分,细分过后逐步实现。
修改 animate 函数如下:
1 2 3 4 5 6 7 8 9 10 11 12 13 14 15 16 17 18 19 20 21 22 23 24 25 26 function animate (offsetLeft ) let newLeft = parseInt (oImgList.style.left) + offsetLeft let time = 300 let interval = 10 let speed = offset / (time / interval) function go ( if ( (speed < 0 && parseInt (oImgList.style.left) > newLeft) || (speed > 0 && parseInt (oImgList.style.left) < newLeft) ) { oImgList.style.left = parseInt (oImgList.style.left) + speed + 'px' setTimeout (go, interval) } else { oImgList.style.left = newLeft + 'px' if (newLeft > -600 ) { oImgList.style.left = -3000 + 'px' } if (newLeft < -3000 ) { oImgList.style.left = -600 + 'px' } } } go() }
此时基本动画已经执行完毕,但是会有 bug,在动画执行过程中,点击到按钮或者圆点,会再次触发动画,导致不规则情况出现。如下图:
所以我们应该在每次执行的时候判断是否当前正在动画,此时定义一个标志位 animated,初始值为 false。
1 2 3 4 5 6 7 8 9 10 11 12 13 14 15 16 function animate (offsetLeft ) if (animated) { return } animated = true ... function go ( if ( ... } else { animated = false ... } } go() }
自动播放 我们希望在鼠标滑出图片,不做任何操作的时候,图片自动播放,鼠标滑入时,停止自动播放。
自动播放就相当于,每隔一定的时间,执行一次 next.onclik() 事件:
1 2 3 4 5 6 7 8 9 10 11 function play ( timer = setInterval (function ( next.onclick() }, 3000 ) } function stop ( clearInterval (timer) } oDiv.onmouseout = play oDiv.onmouseover = stop play()
至此我们的焦点轮播图就完成了,效果图如下:
给出所有 JavaScript 代码如下:
1 2 3 4 5 6 7 8 9 10 11 12 13 14 15 16 17 18 19 20 21 22 23 24 25 26 27 28 29 30 31 32 33 34 35 36 37 38 39 40 41 42 43 44 45 46 47 48 49 50 51 52 53 54 55 56 57 58 59 60 61 62 63 64 65 66 67 68 69 70 71 72 73 74 75 76 77 78 79 80 81 82 83 84 85 86 87 88 89 window .onload = function ( let oDiv = document .getElementById('container' ) let oImgList = document .getElementById('imgList' ) let oButtons = document .getElementById('btnList' ).getElementsByTagName('span' ) let oPrev = document .getElementById('prev' ) let oNext = document .getElementById('next' ) let index = 1 let animated = false let timer function showButton ( for (let i = 0 ; i < oButtons.length; i++) { if (oButtons[i].className === 'on' ) { oButtons[i].className = '' break } } oButtons[index - 1 ].className = 'on' } function animate (offsetLeft ) if (animated) { return } animated = true let newLeft = parseInt (oImgList.style.left) + offsetLeft let time = 1000 let interval = 10 let speed = offsetLeft / (time / interval) function go ( if ((speed < 0 && parseInt (oImgList.style.left) > newLeft) || (speed > 0 && parseInt (oImgList.style.left) < newLeft)) { oImgList.style.left = parseInt (oImgList.style.left) + speed + 'px' setTimeout (go, interval) } else { animated = false oImgList.style.left = newLeft + 'px' if (newLeft > -600 ) { oImgList.style.left = -3000 + 'px' } if (newLeft < -3000 ) { oImgList.style.left = -600 + 'px' } } } go() } function play ( timer = setInterval (function ( next.onclick() }, 1000 ) } function stop ( clearInterval (timer) } oDiv.onmouseout = play oDiv.onmouseover = stop play() oPrev.onclick = function ( if (index === 1 ) { index = 5 } else { index -= 1 } showButton() animate(600 ) } oNext.onclick = function ( if (index === 5 ) { index = 1 } else { index += 1 } showButton() animate(-600 ) } for (let i = 0 ; i < oButtons.length; i++) { oButtons[i].onclick = function ( if (this .className === 'on' ) { return } let myIndex = parseInt (this .getAttribute('index' )) let offsetLeft = -600 * (myIndex - index) animate(offsetLeft) index = myIndex showButton() } } }
Github地址如下:https://github.com/DongpoXu/imooc
参考 慕课网焦点轮播图 封装一个简单的原生 js 焦点轮播图插件